
The following article was written by Cakewalk CTO Noel Borthwick and originally posted to www.noelborthwick.com on Oct. 27th 2012.
Overview
 I recorded my first album with a jazz quartet in 1991. OMG, 21 years ago last century – has it been that long? The original recording was released on cassette tape (!) and is now long out of print. Over the years I got requests for a reissue of this recording from friends and people curious about the music on that project. I had a DAT tape of the final mixes which I had fortunately transferred to WAV files before the tape died (those things have a limited life as I found out the hard way). Unfortunately whenever I’d listen to the mixes, they sounded dated and suffered from some fundamental issues that made them unpleasant to listen to:
- Hard panning of the instruments. (makes mixes uncomfortable to listen to especially on headphones)
- Relative levels of instruments were unbalanced
- Center of mix lacked definition
- Lack of dimension and air
- Missing mastering attention
On a couple of occasions I tried using various mastering tools to rectify some of these problems. However the deal breaker was always the faulty imaging – anything I did would ultimately end up negatively affecting the rest of the mix without adequately addressing the fundamental problems. While working on SONAR X2 earlier this year, I saw R-MIX’s abilities to isolate a voice in a stereo field and remembered this project – would R-MIX be the tool that to use to fix that mix? I’ve always been a fan of Roland’s V-series technology, so the idea of virtual remixing piqued my interest. A few of weeks ago I decided to revisit this project and started doing some experiments. I loaded up one of the more problematic tunes from the project. The synth voice was way too dominant in the mix and the overall frequency balance sounded very harsh. I set up a track containing the stereo wave file with R-MIX in the effects bin. In a few seconds I was able to isolate the instrument in the mix. I then simply dropped the “inside” level in R-MIX and panned the voice slightly to the right to move it closer to the center. This immediately solved the harshness and problem of the voice dominating the mix and resolved much of the hard panning problem. Amazingly there were no perceivable artifacts in the rest of the mix after doing this. I was blown away!
So I began experimenting with the other tunes and found that by using a combination of techniques I could pretty much solve the worst problems in the mixes. I set up a template project with one track for the stereo wave file and two pre-fader sends going to two buses each containing an R-MIX instance. From the first bus I could isolate the voice of interest and from the second I would get the rest of the mix minus the voice. I could use set theory style Venn diagrams to visualize and extract areas of interest from the stereo mix. With a layout like this and cascading sends I could fix problem areas by creating “virtual stems”. Very exciting stuff!
However, imaging and balance were only one aspect of the problems listed above. The other primary issue was the fact that this project had never actually been mastered for CD. It was released on cassette tape from a “cassette master” :-/ I actually was present at the tape duplication facility where I saw the dude there take the final mix tape and make his own “master” by doing a tape to tape copy through some ridiculous mixing board and applying his own EQ to it. Oh man! Anyway needless to say the project needed some mastering love. I have limited time and don’t have mastering chops personally so I needed some help. When I worked on Ramona’s most recent project One of Us I had a few people critique my mixes. One of them was SONAR user and musician Eric Hansen. At the time I was very impressed with the quality and detail of his suggestions, so I decided to let him have a look at my rough remix work. I was able to share the project file with him since he was already running X2, so he could see what I was doing with R-MIX. A day later he sent me back a new version that was way better than my initial mix, had more air and space, the middle was improved and it also fixed the worst of the other problems. Amazing, I could actually now listen to the tune without being distracted by all the bad stuff!
Eric has terrific ears and attention to detail. I was so impressed that I contracted him to do the rest of the project.
Virtual Remixing / Re-mastering Case Study – Ankur
We’ll visit the techniques used to clean up the mix for one of the songs, Ankur. Let’s first listen to the original and the final remixed and mastered version.
Although the final mix is far from perfect, considering that we started from a stereo wave file its pretty impressive what we were able to achieve in the final version. It sounds fuller and much better balanced and the worst imaging problems are corrected.
I asked Eric Hansen to share the techniques and process he used on this project. Below is Eric’s recount of the various steps he took. Over to you Eric. Hands over mic…
——————————————————————————————————————————————-
[Eric Hansen]
Upon first listening to the tracks from Sound Matters, I realized I was going to have to overcome three troublesome areas in order to improve the original mixes.
- Instrument balance
- Widening and balancing the stereo field
- Creating more dimension
These challenges would be overcome through the use of R-MIX SONAR Edition and Izotope’s Ozone 5 Advanced.
The first track I worked with was Ankur. This proved to be a good starting point since the track exhibited all the problems listed above. The drums were panned right and the melodic instruments were panned left. As a result, the stereo image was unbalanced. The original mix reminded me how the Beatles did their stereo mixes. While this can provide clear separation between instruments, the center sounded empty.
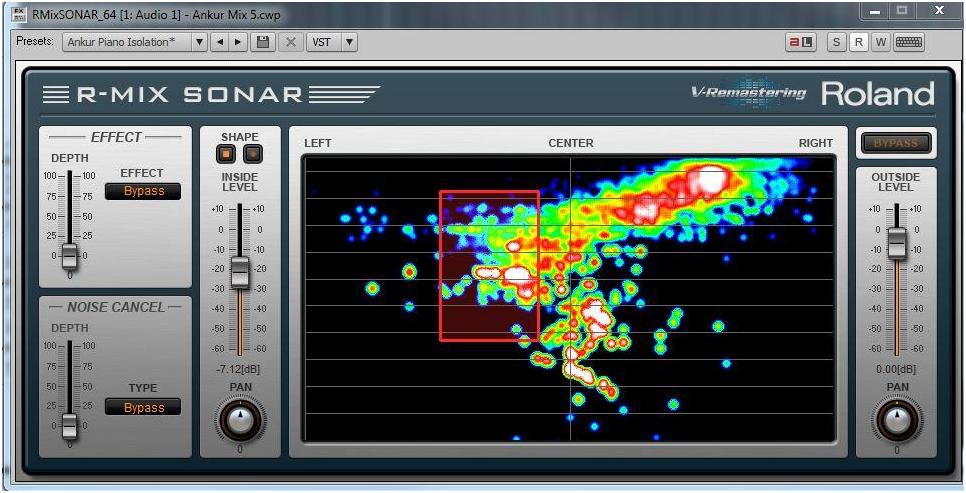
For this session I was working with a two track master. The first step was to remix the instruments where possible. R-MIX SONAR Edition was the perfect tool for the job. My first adjustment was to move the drums from the right side towards the center of the mix. I inserted a send on track 1 and fed a bus with R-MIX in the FX bin. The purpose of this was to create a filter with R-MIX that could isolate the ride cymbal and catch a little bit of the snare drum, which were predominately on the right side. I then panned the output of the bus hard left which doubled the filtered sounds to the left side. This resulted in a balanced image of the drums by pulling the snare towards the center and giving the cymbals a stereo feel. Here is a look at the R-MIX settings used for this task:

The inside level of the filter is boosted slightly while the outside level is completely removed. Removing the outside level isolated the cymbals and snare from the original mix.
The next step was to balance out the synth guitar and piano. At times these instruments were too loud in contrast to the rest of the mix. Again, R-MIX came to the rescue. I inserted two instances of R-MIX on track 1, which I would used to isolate the piano and synth guitar parts separately. Here are the settings for the synth guitar:

When adjusting the drums with R-MIX, a filter was used to isolate a small section of frequencies and double them to the opposite side to create a balanced image. For the synth guitar, I wanted to lower the level of the instrument within the overall mix. To do this I first had to reduce the outside level completely and move the filter around until I found the sweet spot for the synth guitar. Then, I brought the outside level back to zero and adjusted the inside level until I felt the synth guitar was more balanced with the rest of the instruments. Next, I automated the bypass function of R-MIX so the filter would only be applied when the synth guitar was playing the melody.
The same approach was used for the piano. However, this time I automated the inside level of the filter in order to “ride the fader” and keep the piano balanced with the band while playing the melody. Here are the settings for that adjustment:
X2’s new automation lanes made viewing and editing automation easier than ever. Using the updated Smart Tool functions in tandem with expanded lanes allows for quick edits and easy copy and paste operations. I also like the ability to reorder the lanes in a way that reflects the signal chain of a track or bus. For example, if I have the EQ module before a compression module in the Pro Channel the envelopes can reflect that same order.
In the screen shot below envelopes are automating track volume, EQ adjustments and R-MIX settings. The customized order of the envelopes reflects the signal chain: Volume, EQ to R-MIX.

Another new X2 feature, and my favorite, is the Console Emulation. For Ankur, I used the S-Type emulation on the track and mix bus because it warmed up the lows nicely. I usually start with the drive set to 3dB and adjust from there. On tracks and mixes that benefit from more warmth in the lows but need a little more shimmer up top I use the N-Type. The A-Type is good for tracks and mixes that need a little more air up top.
While not a new feature for X2 another great Pro Channel module is the PC4K S-Type bus compressor. I used this module on Ankur as well for a gentle slow attack compression before hitting the multi-band compression in Ozone. Here are the Console Emulation and Compression module settings:

Now that the instruments and image were balanced, it was time to move on to Izotope’s Ozone 5 Advanced and apply the mastering. The main adjustment needed was getting the bass and kick more present in the mix while opening up the top end. I used Ozone’s Equalizer in Mid/Side mode to achieve this. I boosted the low end around 75hz in the mid channel and used an aggressive high shelf on the side channels to add lots of air to the overall mix.
Here are the EQ settings:

Next I used Ozone’s Stereo Imaging to widen the image:

Here I applied a little reverb to the entire mix to add more dimension:

Gentle multi-band compression to smooth out the mix:

Finally, the Maximizer is applied to get the volume of the track up to competitive levels:

I used the K-System metering set at K-14 in Ozone and kept the RMS around 0.
Techniques used on the remaining tunes:
On the remaining tunes I used a combination of the above techniques to widen the mixes and give them more dimension. R-MIX was the main glue to address similar stereo imaging issues that were prevalent in the other tracks as well. Some tunes were more troublesome than others since the pan would move during the course of the song making it difficult to get R-MIX to track its region of interest. In such cases its possible to automate the position of the window dynamically, though it can get harder to track if the pan changes are abrupt.
On the track entitled Dream Theme there was an issue with tape noise that needed to be addressed. The track is a piano and guitar duet with an arrangement that can be quiet at times. Tape hiss and a low end rumble were present throughout this track which I found distracting. I used a noise reduction plug to address this and it worked very well.
On Like Someone in Love there is a lovely piano introduction that sounded harsh on the original recording (due to the bright sound of the digital piano). I ended up cutting the piano intro from the main part of the tune and processed it on a separate track. I used Ozone’s EQ matching feature to measure a solo piano recording from another artist and applied it to the piano intro. The EQ was curve was aggressive but the results were quite dramatic.
In the screen shot below you can see the response curve of the solo piano I measured and the EQ curve applied to match it.

Summary and acknowledgements
The purpose of this article has been to illustrate how you can use the tools in SONAR X2 beyond their primary functions in music production. R-MIX proved to be an invaluable resource to remix/remaster this project starting from a relatively rough stereo source. It would have been impossible to do “virtual remixing” without the help of R-MIX to resurrect this project and fix some fundamental problems that would normally require the multi track audio files or instrument stems at minimum.
If you do mastering work or have to work with just a stereo source files, there are many cases where R-MIX can allow you to make subtle changes to imaging very simply. Mastering and remixing are not the only uses of R-MIX however. It can also be used on tracks to do all kinds of interesting dynamic phase and imaging effects by using its automated parameters.
Many thanks to Eric Hansen for his meticulous restoration work on this project and for documenting the techniques and process used. He rescued a project that I had once considered irreparable! Eric can be reached though his website.
If you’d like to listen to the rest of this project, you can access it here on Bandcamp. Its free while my download credits last.
[The track ‘Ankur’ is dedicated to the memory of sound engineer Prakash Shetty, who recorded this project in his studio Sound Company in 1991. The tune is named after a restaurant he owned, where we had many memorable meals during the course of the recording session. Translated, ‘Ankur’ means “The Seedling”]