When you need to get really detailed, object-oriented mixing is a convenient solution
by Craig Anderton
Many times when mixing, you’ll want to apply an effect or volume change to a small, specific section. Clip Automation makes it easy to handle Gain or Pan changes, but you can also work with effects by isolating specific “objects” in a track, then processing them individually. This is different from the usual method of applying effects to an entire track, but can come in really handy for detailed work. Also note that object-oriented effects processing works with any type of clip—audio, MIDI, or groove.
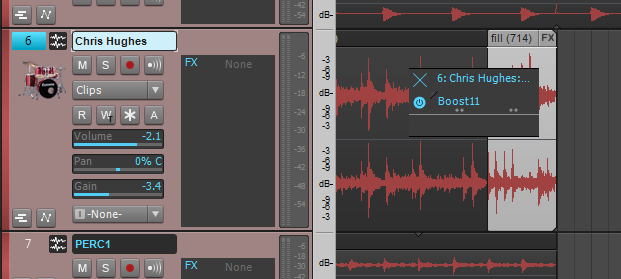
Here’s a step-by-step example of how to apply object-oriented mixing by adding maximization to one drum fill to make it really stand out. Download SONAR X3 to give this a try.
1. To isolate the object from a selected track, alt-click with the Smart tool at the beginning of the section you want to isolate, or place the Now time at this point and type “S.” Do the same at the end of the section.
2. Right-click on the object, and select “Open Clip Effects Bin” from the context menu (keyboard shortcut: Alt+K).
3. An effects bin opens up that’s similar to the standard track effects bin.
4. Right-click on a blank part of the effects bin, choose Audio FX from the context menu, then drill down to find the effect you want.

5. The effect will now appear in the bin. Like a standard effects bin, the small “power symbol” circle (blue for enabled, gray for disabled) appears to the effect’s left. To insert more effects, repeat step 4.
6. As soon as you click anywhere other than the effects bin, the object’s bin minimizes to a small box that says “FX.” This indicates there’s an effects bin in the object. (You can also minimize the effects bin by clicking on the “X” in the upper left corner.) To re-open an FX bin (e.g., for adding more effects), just click on the box. If you can’t see “FX” because the clip is too narrow, you can always click the clip and type Alt-K.
Note that any effect in an object stops processing at the end of the object because there’s no more object to process—so any delay tails caused by feedback, or reverb tails, will be cut off. If necessary, use slip editing to lengthen the clip by adding silence to the end, then bounce the clip to itself to make this change permanent.
OTHER BIN TRICKS
- To bypass the bin and all its effects, right-click anywhere within the bin and select “Bypass Bin.” You can also invoke the various effects chain tricks, like convert the FX bin to an FX chain, load a chain, or or save a chain.
- To re-arrange the order of effects within the bin, click-drag effects to the desired position in the chain.
- To delete an effect, click on it and hit Delete, or right-click on it (or its enable box) and select “Delete” from the pop-up menu.
- If you split clip that has clip effect, the split clips will also contain these effects—very thoughtful, because the odds are that if you wanted to apply an effect to a clip, you’d want the same effect applied if the clip mutated into sub-clips.
- Clips in Take Lanes can have FX bins as well.
DSP, TOO!
You can also apply DSP effects, like Gain and Normalize, to individual clips or sections of individual clips. In this case you don’t need to actually split the clip, you can just drag over the area you want to process to select it, then invoke the desired DSP function from the Process menu. I’ve found this technique invaluable for tweaking gain on vocals when I want a consistent level from a vocal performance, as it evens out volume variations without having to apply any kind of dynamics processing. And when I do apply dynamics, the results are more consistent, so any compression or limiting sounds less “processed.”
Learn more about Mixing in SONAR X3

