Take Control of Your Mix with Mix Recall

Mix Recall is a powerful way to organize mixes within a project—Whether you want to have a mix without vocals or a version of the song using a different processing chain on the drums—Mix Recall is the perfect solution for these types of situations, but it can do more than that. Say you are handed a project from someone else using SONAR or you got a new plug-in you want to try out using a previously recorded song, Mix Recall can help you handle this as well by getting your project reset back to a neutral position.

Adding the Mix Recall Module

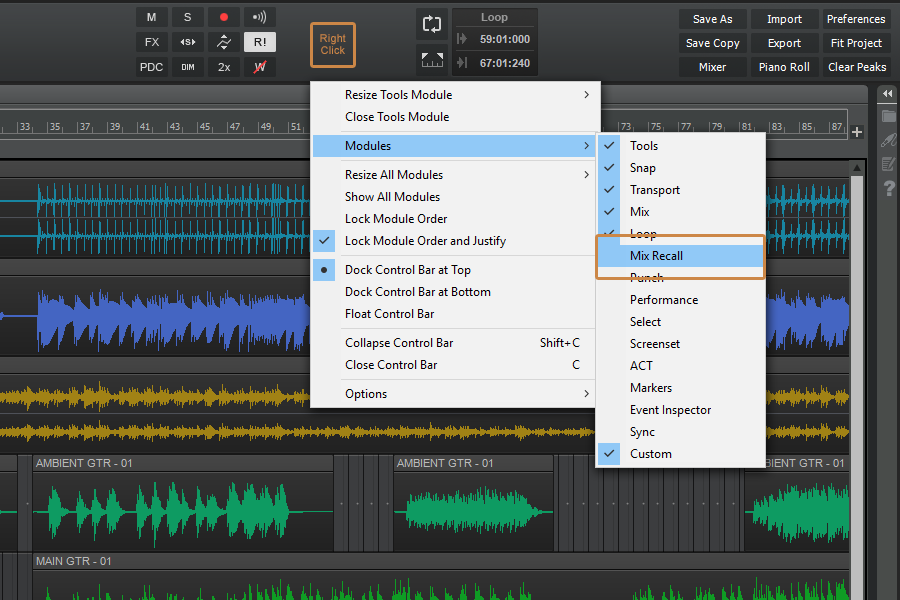
Check that you have the Mix Recall module available in the Control Bar. You can add it to the Control Bar if it’s not already there by right-clicking in a blank space and adding it from the menu.

Creating a Mix Scene

Start by creating a new Mix Scene with the current project setting using the [Save As New Scene] button.  This will allow us to make a change and then come back to the original point to see the difference.

Make a change to the mix by adjusting the volume on a couple of tracks or muting a track previously un-muted.

Click the [Save As New Scene] button on the Mix Recall module again to save these changes into another mix scene. Give this mix a unique name and save it. Now you can reload your previous mix and see the changes reverted back to where we started. Selecting the second mix scene with bring us back to the present state of the mix. You can also use the [Recall Previous Scene] button to toggle back and forth between 2 mix scenes or simply go back to the last mix scene you were at.

Resetting a Mix

Using a project you want to reset, click the drop down arrow on the Mix Recall module and select “Reset Mix…” from the menu. This will remove all automation envelopes, plug-ins, and reset the ProChannel back to the default modules along with any controls in SONAR.

That’s It! Now you can get back to working on your mix instead of trying to manage multiple saved versions of the same song or trying to manually remove each plug-in or automation envelope.

Advanced Techniques

  • Create a save point as you begin your mix once you have basic levels and panning so you can always go back and hear your project from the start.
  • Create save points within your mix to go back and see how it has progressed.
  • Save several iterations of a mix and bounce each when sending it to a client or friend. Here are some common iterations to save as Mix Scenes.
    • Vocal Up Mix (Plus 1-3dB)
    • Vocal Down Mix (Minus 1-3db)
    • No Vocals
    • Radio Edit Mix
  • Time box your mix by only giving yourself an allotted amount of time and dividing that up over what you need to do.  Save each stage as a Mix Scene to go back and look at your progress and how you did at each stage.

Mix Recall is available in SONAR Artist, Professional and Platinum

You won’t believe what these 10 people said about Cakewalk's Adaptive Limiter

The Adaptive Limiter is the latest addition to the included plugin lineup for SONAR Professional & Platinum. It is a professional brickwall peak limiter designed for both mixing and mastering. It features 4 different limiting “Character” types, Configurable Lookahead, Inter-sample Peak Detection, L.U.F.S. Loudness & K-Metering, as well MP3 codec preview, and real-time dithering.  It’s only been out for a few months now and we are already getting amazing feedback from customers.

Here’s what they are saying…

“The Adaptive Limiter has quite a few surprises in it, especially for such a simple, straight forward plugin. I like the nicely ordered presets, the “Match Input Loudness” feature for the bypass A/B switch, and the K / LUFS metering. And yes, the Dither / MP3 Encoding Preview is quite useful too! With the Adaptive Limiter, I can have it active on my master bus and still track new instruments, with no latency while playing.” – Lee Shapiro

“The Adaptive Limiter is possibly the best brickwall limiter in the business, big call I know, but after using various limiters over the course of 18 years…I was blown away when I got this.” – Benjamin Phillips

“The Adaptive Limiter is a fantastic tool, Great job Cakewalk! I tried it on several songs and tracks and was surprised by how good the Adapted Limiter works. Big thumb up!” – Holger Bremer

“I like the Adaptive Limiter a lot. It works good on both the master as well as buses and even tracks!” – Ken-Arve Nilsen

“The Adaptive Limiter is really great! I use it as the last limiter in my chain on the master bus… I think it may be one of the best brickwall limiter plugins I’ve heard, The LUFS metering is a really nice addition along with the input volume matching to hear the limiting before and after. It all really helps me create a great master!” – Hubert Torzewski

“I have found that Adaptive is extremely transparent!! It’s almost like it’s not even there…” – Sidney Goodroe

“Easily the best limiter interface I’ve seen yet. It also doesn’t hit the system too hard and as something included with a SONAR, well it is absolutely first rate.” – Jesse Stengel

“The Adaptive Limiter is soooo AWESOMELY INCREDIBLE. I love it! I love Sonar! It’s the best DAW on the planet!!” – Lana Slaughter

“I’m very happy with the Adaptive Limiter. Thank You Cakewalk! It certainly holds it’s own compared to the other 3rd party limiters I have.” – Kenny Wilson

“I am loving the Adaptive Limiter. I used it on a rock instrumental that I just finished recording and it sounds great and I prefer it now over Ozone. Great to have all these awesome stock plug in’s. I just recently moved to Sonar and find my mixes are sounding more pro. I am not having to use my purchased plug ins much as SONAR just delivers!” – Mark Stow

If you don’t already know the Adaptive Limiter, we made this video to help get you aquatinted. It is available by downloading the latest version of the Engineering Suite included with SONAR Professional & Platinum.

Enjoy!

The Miracle of Mid-Side EQ: Rock Your Mixes and Masters

by Craig Anderton

Sure, the LP EQ is a great linear-phase, stereo EQ. But it was designed for mid-side processing as well as conventional stereo, so let’s explore what mid-side processing is about, and why it’s so important.

LP EQ BASICS 

You can add up to 20 nodes, and each can have one of the following responses:

  • Low shelf
  • High shelf
  • High pass
  • Low pass
  • Peak boost/cut


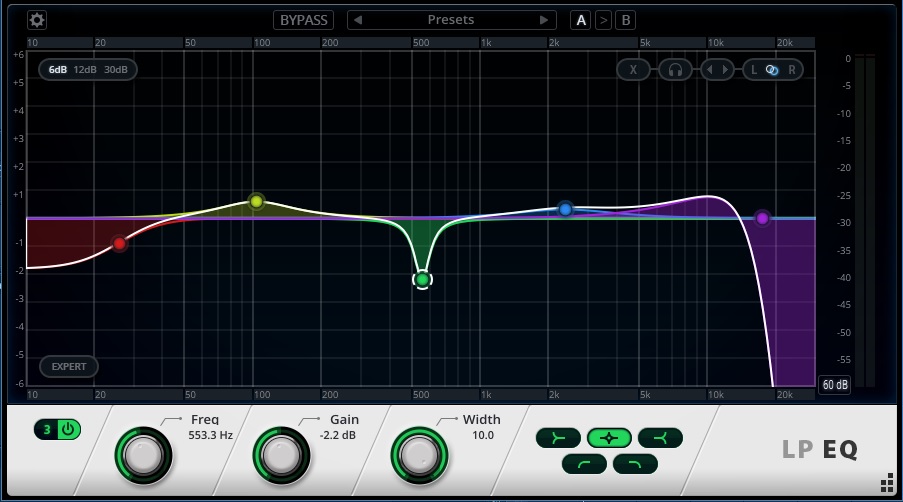
The LP EQ allows up to 20 nodes
The LP EQ allows up to 20 nodes, which can choose from five responses.

However, there’s some intelligence when adding nodes; for example if you double-click to enter a node close to the highest possible frequency, the LP EQ will insert a lowpass filter. At a somewhat lower frequency, there’s a shelving response (although you can of course change these default responses to whatever you like). Drag nodes horizontally to change the frequency or up/down to vary amplitude; a right-click + drag on a node alters the width, as does using the mouse scroll wheel on a selected node.

You can ctrl+click, or draw a marquee around, multiple nodes to select them, but there’s an interesting twist. Suppose a node is set to boost, and another to cut. If you select both, then click on the one that boosts and drag it downward, the amount of boost will decrease. However the one that’s cut will start boosting. This complementary motion allows increasing or decreasing the overall emphasis easily; for example, if you think you went too far with the amount of EQ and want to pull it back, this reduces all aspects equally.

If all the selected nodes either boost or cut, then their amplitudes vary together.

These basics give a flavor of the features, but there’s much more—so click on the UI to give the LP EQ the focus, then press F1 to call up the comprehensive documentation.

MID-SIDE EQ PROCESSING

Mid-side processing encodes a stereo track into two separate components: the center becomes the “mid” component in the left channel, while the stereo track’s right and left elements become the “side” component in the right channel. You can then process these components individually, with automatic decoding back into stereo.

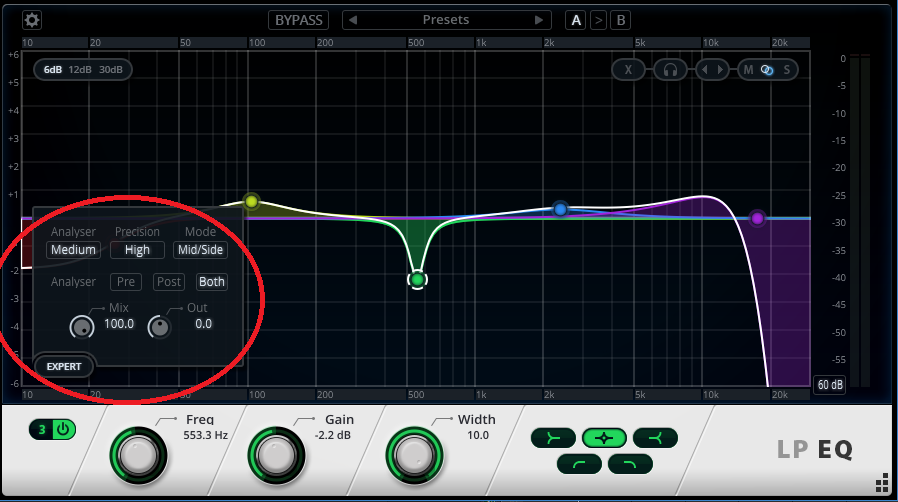
To get started with mid-side processing, click on the LP 64’s Expert button and under Mode, choose Mid/Side. For best results, set the precision to High. This results in the most latency but the highest accuracy, which is important because with mid-side processing, you don’t want any phase shift or sample misalignment—that will interfere with the decoded stereo imaging.

the LP EQ's Expert Mode access Mid-Side processing
The LP EQ’s Expert Mode is the key to doing mid-side processing with EQ. Also note the Mix control for parallel processing.

Processing can be independent for the mid and side components (as it is for the left and right channels in conventional stereo applications). You assign a node to the appropriate component by clicking on the node, and then clicking on M or S (toward the LP EQ’s upper right corner). Here are a few possible applications.

  • With mastering, you can get “inside the file” to do pseudo-remixing on a stereo track. One typical application is giving a slight boost to the higher-frequency side components to provide a bit more “air” and a wider stereo image.
  • If you’ve been seduced by vinyl’s comeback, remember that it’s crucial to center the bass and minimize bass excursions in the sides. With mid-side EQ processing, you can reduce the bass in the sides, and if needed, increase bass a bit in the center. Even if you’re not mastering for vinyl, taking this technique further can give a super-anchored, “center-channel” bass sound.
  • Drums with lots of room ambience can benefit from a bit of upper mids in the sides for extra definition, and a little bit of lower mids in the center to accent the kick.
  • If a synth bass has a wide image that “steps on” other instruments, you can bring down the bass in the sides.
  • For taming reverb, set a node to Mid, select the high pass curve, and slide it all the way to the right to take out essentially everything. Then you can shape the remaining reverb with the side EQ, while chasing the away from the center, where it can muddy the bass and kick.

THE VALUE OF THE MIX CONTROL 

But…how do you know whether you’re really making an improvement to the sound or not? The LP EQ includes a Mix control (accessed in the Expert section) so you can vary the mix from full EQ to no EQ. Yes, parallel processing for EQ…very handy, and even better, the Mix control can be automated (like virtually all other parameters, including display characteristics and bypass).

You can also switch quickly between two different EQ settings with the A/B comparison function.

Granted, there’s no shortage of EQ plug-ins, but the LP EQ truly brings something new to the party. If you’re not familiar what mid-side processing can do with EQ, there’s no better way to find out than with the LP EQ.

LANDR Blind Taste-Test

UPDATE: Results are in! Here’s the answer key:

It was a very tight race, but the clear winner was Track 3 (so there is definitely still plenty of room in this world for professional mastering houses).

In 2nd place was Track 5, which was followed extremely narrowly by the LANDR masters, where Track 4 beat Track 2 by almost nothing. Track 6 was next, and Track 1 was last.

Note: These masters were intentionally not level-matched, as we believe that for a song of this style, the resultant level was part of the criteria for the quality of the masters. We will be doing another one of these tests in the future, wherein the levels will all be matched.

What do you think? Do these results surprise you? 


We thought it would be fun to have a blind mastering taste-test and include LANDR. Below is a track from a project I Co-wrote/recorded/produced/mixed compliments of a great artist from Finland by the name of Peppina.

Track 1 is the actual pre-master, and then the following tracks are masters rendered by different means.

One of these tracks (the one that is actually on the record) is mastered by a prominent mastering house/engineer in NYC.

A few also may be rendered with different LANDR settings 😉

One is also mastered using all in-house Cakewalk plug-ins…

Below these tracks you will find a survey, please vote for your favorite “master” and leave any general comments.

Results will be posted in 2 weeks.

Create your own user feedback survey


panup: Studio Session & LANDR Test

by Panu Pentikäinen (panup at Cakewalk forums)

Alex PortraitAlex ja Armottomat (Alex) visited my recording studio in February. We had five days total to do a fully mastered CD, make promo photos of the band, and record live video footage in the studio for later editing. I’ll describe here how one of the six songs was recorded and mixed.

Drums, bass and the electric guitar were recorded live with one to three takes. Acoustic guitar and demo vocals were recorded, too, but they were re-recorded later over the backing tracks. The drummer was the only one to hear the metronome (standard SONAR audio metronome, time signature set to 1/4); the others had eye contact with the drummer. Although the guitar amp was in another room (the bass was recorded direct), there was no spill other than a faint demo vocal in the drum room mics.

Time is always an enemy when you have to record many songs in a limited amount of time. I decided to make decisions before pressing the R (record) button rather than leaving everything to the mixing phase. I applied EQ to kick drum, drum room and the acoustic guitar before A/D conversion. One of the phrases I hate is: “This sounds like crap now but it hasn’t been mixed yet.” Some people really think that everything can be fixed in the mix! (Although to be fair you often can, because in SONAR we have VocalSync, built-in Melodyne, built-in drum trigger, and AudioSnap).

And although it sounds incredible, now it’s even possible to upload songs from SONAR to the LANDR online mastering service and instantly hear a preview of how the song would sound as mastered. Hearing the demo master may help you to improve the project’s mix. Continue reading “panup: Studio Session & LANDR Test”

DAW Best Practices: How to use metering in SONAR

[Originally posted as a daily tip on the SONAR forums and reposted for viewers here on the blog.]

The Overachieving Meters

by Craig Anderton

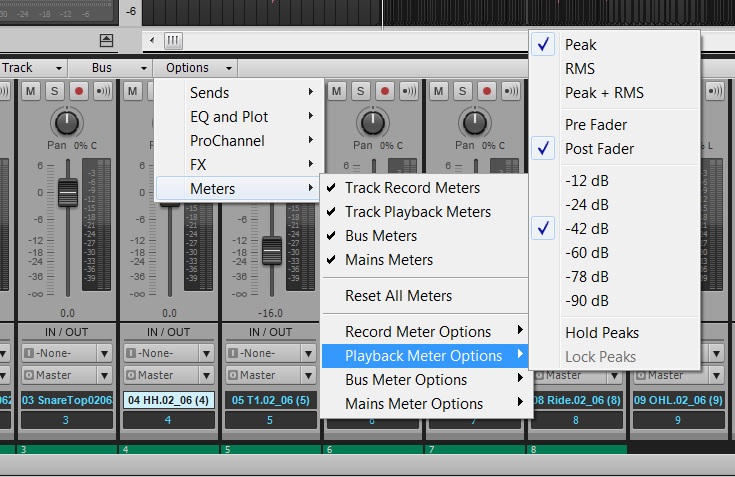
To change resolution for any audio meter, in any view, right-click on it and choose a range of 12, 24, 42, 60, 78, or 90 dB. Each meter can have its own range. With the Console view, I set the output bus meters to 12 dB to help gauge the approximate amount of loudness maximization that may be required. For example, if the meters make it to 0 but otherwise spend very little time in those upper 12 dB, then the track will probably need to be made “hotter” when mastering. For the Track View track meters, choosing the maximum resolution (90 dB) helps reveal if there’s noise at the lower range of an incoming signal.

Vertical or Horizontal Metering

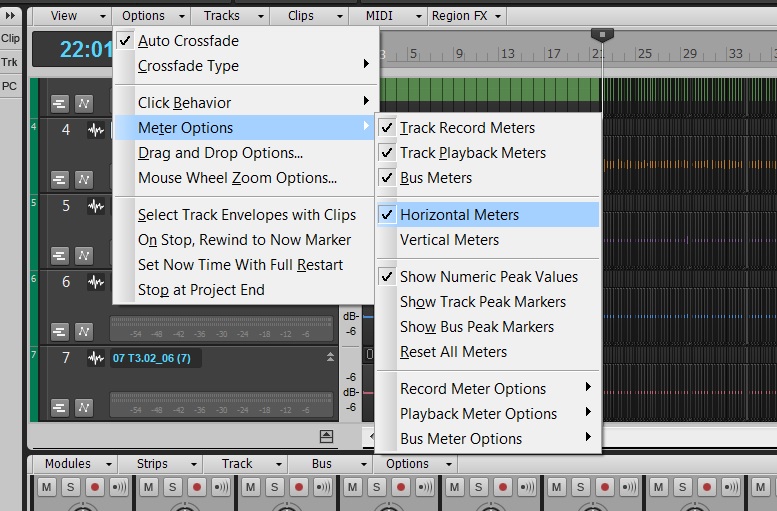
In Track View, the meters can be vertical or horizontal. Choose Options > Meter Options and select the desired option. When vertical, the meters behave more like activity/clipping indicators, because when you collapse the track to a short height, you basically see only activity and clipping. If you use the Console for mixing, this is a good choice because you can see more track parameters in the Tracks Pane, as the vertical meters don’t take up space along the bottom.

If you generally mix using the Track View rather than the Console, then you can extend the width of the Track Pane, enable horizontal metering, set them to a fairly wide playback range, and enjoy high-resolution metering. Also under Options > Meter Options, you can specify the Record, Playback, and Bus meter characteristics. Choose from Peak, RMS, or Peak+RMS (my favorite choice) response, whether playback meters are pre- or post-fader, and whether bus meters are pre-fader, post-fader, or pre-fader and post-FX.


These settings are independent from equivalent meter settings for the Console view. You can also choose whether peaks are held or locked (I recommend checking both), as well as show Peak Markers. These indicate the highest point in the track and can be extremely useful when mastering.

This kind of flexibility allows the Track and Console views to be far more than just two ways to view the same type of material. For example, the Console meters are probably better set to post-fader, so you can see at a glance which tracks are contributing the most amount of level. But in Track view, a pre-fader setting lets you monitor track activity so you can check whether a Track has signal, regardless of the fader position. The metering options are just one more reason why I tend to mix in Console view, but track and edit in Track View.

Want to check our SONAR? Try our 30-day free trial.

Virtual Instruments: 5 Tips For The Z3TA+ Junkie

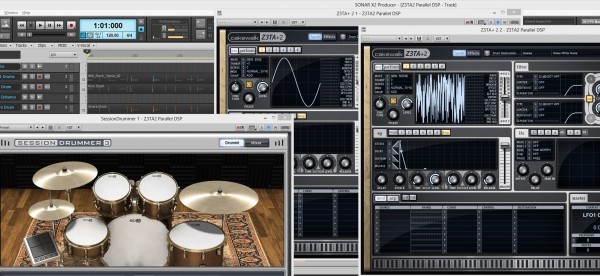
Here are some of our favorite Z3TA+ tips and videos from our archive:

1. EDM Production – Enhance Your Drums with Z3TA+ 2

  • Insert two instances of Z3TA+ 2.
  • Copy your drum sequence to both Z3TA+ 2 tracks.
  • Isolate the Kick on one track and the Snare on the other.
  • Setup the first Z3TA+ 2 to generate a Sine Wave for the Kick.
  • Setup the second Z3TA+ 2 to generate White Noise for the Snare.
  • Adjust the Amplifier Envelope to match the duration of each hit.
  • Within Z3TA+ 2 add Reverb, Compression, and EQ.
  • Mix in under your existing Drum Loop.

2. How to Customize Z3tA+ 2’s Stock Arpeggios

Z3TA+ 2 comes packed with a massive pool of MIDI programs that power it’s internal Arpeggiator, but why stick to the stock programs when you can make your own?

Here’s how:

  • Open Z3TA+2 and activate the Arpeggiator Section
  • Right-Click on the sequence in the arpeggiator and make sure the following are checked
  • Auto Disable Pattern When Dragged to Host
  • Auto Fit Patterns to One Measure When Loaded
  • Load one of the Arpeggios from the Pattern menu
  • Drag and Drop the Arpeggios right into SONAR X2
  • Edit the MIDI Clip to your liking
  • Go to File > Save As
  • Select MIDI 0 in “Save as type”
  • Go to C:\Cakewalk Content\Z3TA+ 2\MIDI Arpeggios and Save it
  • Load it into Z3TA+2′s Arpeggiator by going to Pattern > Load MIDI File…

3. How to create a bass synth with Z3tA+ 2

Who doesn’t like bass? Especially synth bass. Z3TA+ 2 is the answer to all of your sound design needs especially when you are looking to improve your production in the low end. I’ve put together a short tutorial on how to make a simple bass synth inside of Z3TA+2. Once you understand how everything works together you’ll be able to really start to make this plugin work for you.

Picking the right Oscillators

Within Z3TA+2 the first section you need to start working with is the OSC section. First I’ve selected two different square waves for OSC 1 and 2. They were Vintage Square 1 and Vintage Square 2. When creating a bass synth you need to make sure that your patch will not break up in the low end so be sure not to drop the octaves on the individual oscillators too low. I typically set mine to -2 at the most. Once you get to a certain range the instrument will sound weak and lose it’s driving Bass Synth sound

[READ THE REST OF THE TIP HERE]

4. [VIDEO] Digital Sound Factory Z3TA+  Sound Design

5. [VIDEO] Mixing and Mastering a song using only the Z3TA+ effects engine in SONAR

Is Your Project Ready For CD Manufacturing? A DIY Album Release Checklist

This post originally appeared on Disc Makers’ blog. Reprinted with permission.

– Before scheduling your album release, plan for the steps that lie between songwriting and disc manufacturing –

Releasing a CD is a big deal for any artist. This is your baby, your calling card, the result of a lot of hard work, and your best chance to earn revenue. You spend a lot of time writing, rehearsing, and recording — and that’s all just leading up to the CD manufacturing process.

Before you gather your materials to submit for CD manufacturing, there’s rehearsing, recording, audio mastering, designing your package — and all these processes can take longer than you might expect. Then there are the numerous music promotion and sales activities, and much of your PR may require your Continue reading “Is Your Project Ready For CD Manufacturing? A DIY Album Release Checklist”

What's in SONAR X1 Producer anyway?

What's in SONAR X1 Producer?

With the First-class Upgrade promotion happening in June, it’s a good time to review the amazing value you get with SONAR X1 Producer. Whether you are upgrading or looking for a new digital audio workstation (DAW), SONAR X1 Producer gives you hundreds of dollars in exclusive features, instruments, and effects that only Cakewalk can offer musicians, producers, and engineers.

Let’s start with a quick video which goes through all the SONAR X1 Producer exclusives:

Now let’s take a look at some of the exclusive features in-depth to see what makes SONAR X1 Producer so special. Continue reading “What's in SONAR X1 Producer anyway?”