Vocal Month: Extreme Vocals – Picking the Right Vocal Microphone Part III

Last but not least we engineered a session with Eric Alper, the lead vocalist for the Punk band “Knucklewagon” to see how these microphones performed under an extreme style of singing.

Screaming is common in Heavy Metal and Hardcore styles – both of which have a massive underground following throughout the world. If you’re into this style of music then you’ll understand that there is much value in understanding how the microphone you choose will later sit between the instrumentation of this type of music.

Listen intently on the way his vocals sit between the drums and heavy guitars. Keep in mind there is little to no processing on these vocals so that you can understand where the mic will naturally sit in the mix. For the most part, vocals in the extreme style tend to sit above the snare and close to the “crisp” sound of the guitars. It’s hard to reduce the harshness of this style of vocals with EQ – so pick a microphone that brings the aggression you need as well as a smooth dip in the 1K range.

Decisions, decisions…

As we stated in Part 2 of this series, it’s hard to shape your understanding of which microphone is the best due to the different styles that we’ve presented in this series. At this point you have to sit back and think about a few things.

  • What’s your price range?

  • Do you have a microphone that already does what you need to do?

  • Do you want 1 vocal microphone for everything?

  • Do you want options?

Think hard about these questions before making your purchase and try your own shootouts. Some places have trial periods that guarantee a date range of time that you can own the microphone, decide if you like it, and then return or exchange it. These are all great options when picking a microphone. Don’t let someone TELL you what you want. Figure it out for yourself and gather your own opinions.

Missed Part 1 & 2? Check them out here:

VOCAL MONTH: PICKING THE RIGHT VOCAL MICROPHONE PART I

VOCAL MONTH: BEATBOXING – PICKING THE RIGHT VOCAL MICROPHONE PART II

Want to learn more about SONAR X3? Check it out free for 30 Days.

Vocal Month: Beatboxing – Picking the Right Vocal Microphone Part II

To continue on our quest of choosing the right vocal microphone we tracked another style of vocals to help understand the caliber of the microphones for the shootout. Gene Shinozaki is a local Boston resident that performs on the streets and in the in the studio. You can subscribe to his page here. Here’s the beatboxing mic shootout that we did with him in less than 1 minute:

Interestingly enough, recording a beatboxer is a pretty useful way of understanding the true range of a microphone without having too much setup involved. Beatboxers use all different types of techniques to warp and skew their mouth in ways that span a wide frequency spectrum. Producers like Timbaland and the like will even use this on their tracks to enhance them.

A Beatboxing Perspective

Let’s look at the set of microphones from a beatboxer’s perspective now that we understand how they sound on a female vocalist. Continue reading “Vocal Month: Beatboxing – Picking the Right Vocal Microphone Part II”

Vocal Month: Picking the right Vocal Microphone Part I

Having a go-to microphone is always a great policy to have, but understanding the way specific microphones sound and perform is an even greater depth of knowledge every engineer or aspiring engineer should understand. To a trained ear – different microphones sound drastically different in character, response, and tone. The best way to start understanding these differences is easier thank you think. Start comparing microphones – and get nerdy about it!

Here’s our own Cakewalk microphone shootout displaying 5 different microphones on Ingrid Gerdes.

Continue reading “Vocal Month: Picking the right Vocal Microphone Part I”

Beatboxing – Watch What Happens to the Frequency Analyzer in SONAR X3

Within the Vocal world  there are all different styles of singing and beatboxing is one of the more complex and percussive styles that the human voice can produce. Typically there is a single frequency range that vocalists stay within but beatboxers span the entire frequency range to achieve the sounds that come from their mouth. Check out this video with a local Boston street performer as he shows us how it’s done:

Wanna try the QuadCurve EQ? Check out SONAR X3 30 Day Trial

Vocal Month: Creating Vocal Harmonies with Melodyne Essential

Can’t quite hit the high or low notes? Melodyne usually can.

by Craig Anderton

If you don’t have a wide vocal range, you have to choose a vocal’s key very carefully—the low parts can’t go below your range, and if you’re going to hit the harmony notes, you have to pay attention to where the highest notes fall as well. Unfortunately the voice sometimes loses power when you start hitting your lower limits, but if you choose the best possible range for your lead vocal then you may have a hard time hitting the harmony’s high notes. What’s a singer to do?

My solution is to choose the optimum key for the lead vocal, then reach for Melodyne Essential to synthesize the harmonies. Most of the time I can hit the harmonies so I’ll sing them “for real” and bring in Melodyne as needed, but I’ve also found merit to using Melodyne to generate the harmony even if I can hit the notes—it gives a different character that works well in some musical contexts.

Creating Harmonies

Generating harmonies requires some manual effort, but it’s worth it.

1. Clone the lead vocal.

2. Create a Melodyne Region FX for the clone.

3. Solo the lead vocal and clone (Dim Solo can be useful for this application so you can hear the vocals in context).

4. Start adjusting the clone’s blob pitches to create the harmony (Fig. 1).

Fig. 1: Thanks to a paint program’s transparent layers, colorization, and cut and paste, this shows the harmony line (blue) superimposed on the lead vocal.

Usually the easiest way to do this is by ear, but if you’re theory-minded, you can always apply those rules to determine which pitches to use for the harmonies.

Additional Tips

I highly recommend choosing Edit > Pitch Grid > No Snap and adjusting the harmony pitch by ear. Snapping doesn’t always produce the most musical results.

Also, check out my article Easy Automatic Double Tracking with Melodyne Essential, which describes how to add slight timing and pitch variations to do automatic double tracking. Applying the same technique to the harmony line prevents it from “shadowing” the lead vocal, and helps the harmony establish itself as an independent entity.

There’s a video on my YouTube channel that uses Melodyne Essential for creating both ADT and the harmony effects described in this article. In fact, there’s only one vocal track in the entire song; all the others were derived from it using Melodyne.

Finally, I demoed this technique during the video I did at Berklee College of Music last March. You can see the video here.

Happy harmonizing!

BETTER TOGETHER: TRY SONAR X3 AND MELODYNE FOR FREE!

Vocal Month: Easy Automatic Double Tracking (ADT) with Melodyne Essential

There’s a great ADT program lurking within Melodyne Essential

by Craig Anderton

So is Celemony’s ADT (Automatic Double Tracking) program any good? If you have Melodyne Essential, you can find out for yourself—because it’s the same program. Yes, hidden within SONAR X3‘s Melodyne Essential is a very cool ADT effect that’s extremely effective with vocals.

Introduction

Double-tracking is the process of singing a second vocal on top of a main vocal to “thicken” the overall sound. It’s impossible to sing a vocal exactly the same, so there will be slight timing and pitch differences that add interest and depth. Automatic Double Tracking produces this effect electronically, which can give more control over the double-tracked vocal. While there are dedicated plug-ins to give the ADT effect, Melodyne has all the tools needed to do this. I’d go so far as to say Melodyne can produce one of the best electronically generated ADT effects I’ve heard.

The Melodyne ADT effect works best with vocals where you haven’t already added extensive pitch or timing correction. As an aside, I never do a “wholesale” quantization of notes; to my ears, removing the “incorrect” pitch variations in a vocal actually create a less compelling performance. Instead, I manually correct only those notes that actually sound “wrong.” Even then, I don’t always quantize exactly to pitch. Music is about tension and release, and subconsciously, you’ll often sing a little flat or sharp (tension) and end up on pitch (release). Making all the pitches “perfect” removes this emotional component.

As an analogy, conside B. B. King’s guitar playing. He often bends a flatted 7th not quite up to pitch. By not resolving the note, instead of completing the phrase it leads you into the next one. Timing and pitch variations are an essential part of music, so don’t overdo the correction.

Setup

It’s easy to set up the ADT effect with Melodyne.

1. Clone the vocal to which you want to add the ADT effect.

2. Right-click on the cloned click and create a Melodyne Region FX.

3. Select all the notes in the vocal.

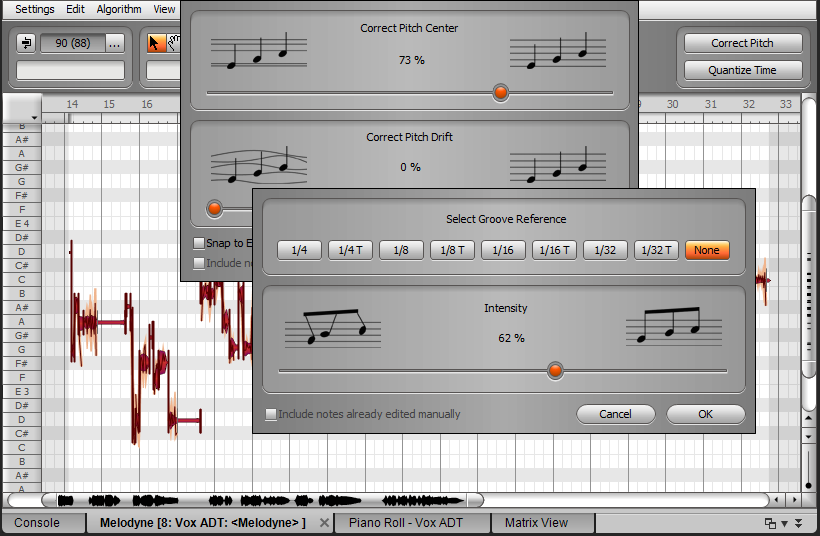
4. Turn up Correct Pitch Center to about 60% (Fig. 1).

Fig. 1: Correcting pitch and  timing subtly on a cloned vocal track can produce an automatic double-tracking effect.

5. Turn up Quantize Time Intensity to about 60% (Fig. 1).

6. Evaluate the ADT effect, and tweak the pitch and timing correction amounts as appropriate.

Generally you don’t want too much pitch or timing correction—just enough to be different from the main vocal.

Mixing ADT Vocals

When mixing, centering the two vocals tends to maximize the similarities to chorusing; the vocals sound somewhat more diffused, which works well for “gentler” material. Panning them slightly oppositely (about 30% right and 30% left) can give a more spacious sound in stereo.

With sparser mixes, centered panning often fits best while the somewhat spread sound helps the vocals have more presence in dense material, like hard rock with lots of distorted guitar. However, these aren’t “rules” as ultimately, the song itself will dictate which works best in the final mix.

Give this technique a try—I think you’ll be as surprised as I was about how effectively it provides an authentic, convincing ADT effect.

BETTER TOGETHER: TRY SONAR X3 AND MELODYNE FOR FREE!

SONAR X3 QUICKTIP: MAKE YOUR VOICE THICKER (STUDIO & PRODUCER)

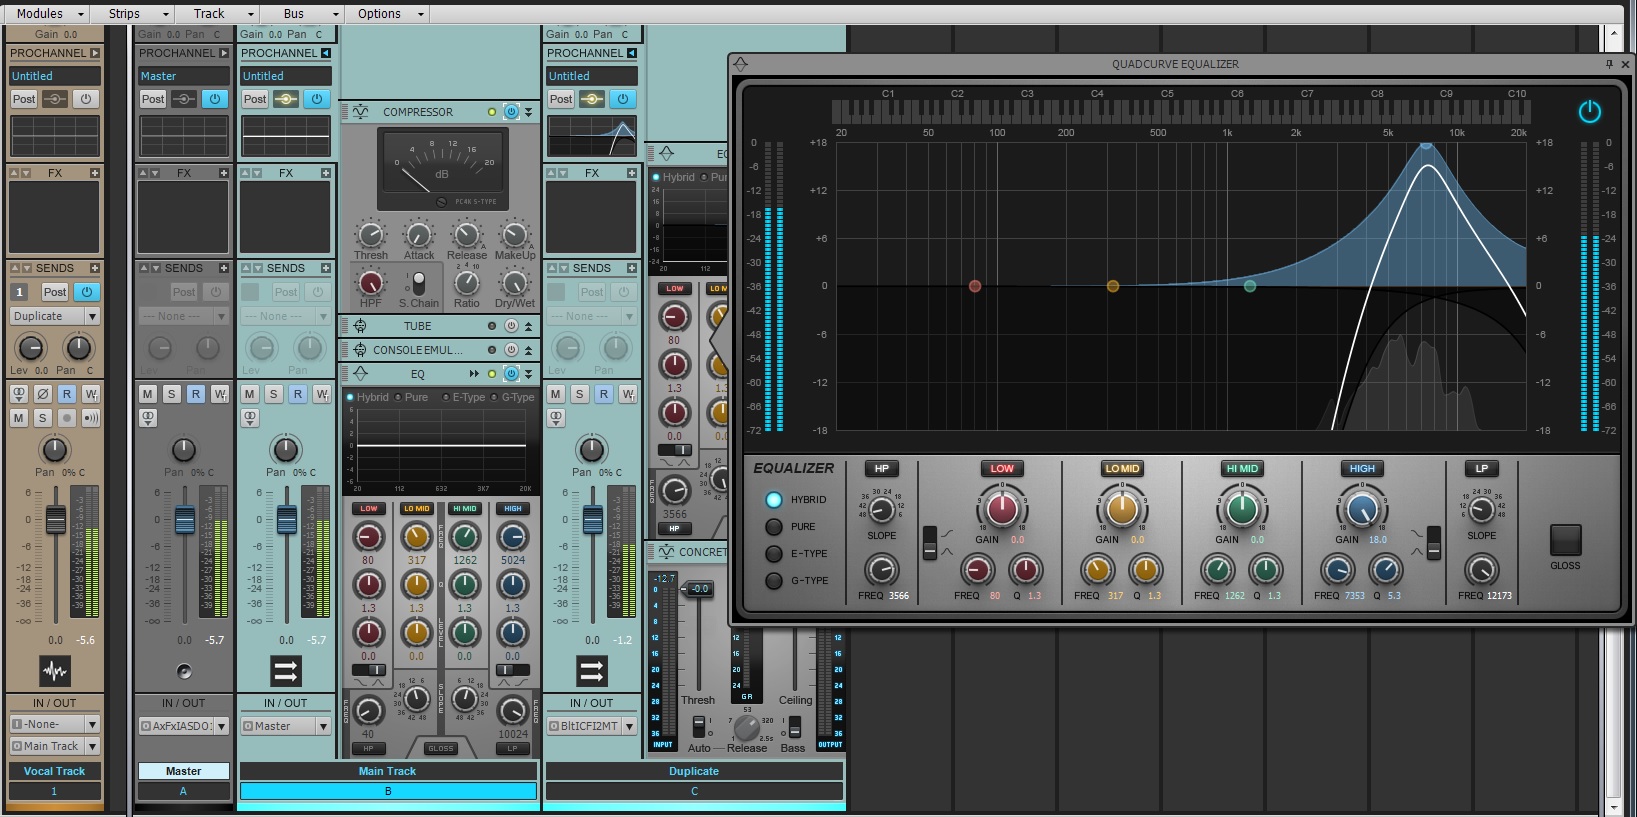
SONAR Production Tips – Building A ProChannel De-esser

Introduction

SONAR X3’s modular ProChannel allows users to take advantage of all the different aspects of a real mixing console. One great way of improving your vocal production is by using De-Essers to reduce the sibilant frequencies between 5-7kHz. The human mouth acts like a filter for words and sometimes certain words for certain singers can produce unwanted hissing sounds that get in the way of mixing. You can build your own De-Esser within the ProChannel by using the following steps.